How to Set Up Basic Goals in Google Analytics
In This Guide
Set Up Goals in Google Analytics to Track Conversions
There are many ways to track how users behave and interact with your website. There are many metrics you can use to measure this behavior, including simple traffic or session counts, time spent on your site, and bounce rate. The end goal of the majority of SEO campaigns is to increase incoming lead generation or to increase conversions on the site. To know if your SEO efforts are successful, you have to be able to measure conversions.
What counts as a conversion? A conversion is whatever is a valuable user action to you. In the world of lead generation, this tends to be any way a customer can contact you: form submissions, phone calls, emails, chat windows, and more. Let’s focus on three of the most common conversion actions: Form Submissions, Phone Calls, and Emails.
Step 1: Set Up Your Tag Manager Account
Having a working Google Tag Manager (GTM) account is the first step to tracking these conversion actions. Google Tag Manager is a free tool supplied by Google for webmasters, digital marketers, and anyone, really, to implement code snippets, tags, and more without having to hard-code the site or CMS.
It’s free and relatively simple to set up a Google Tag Manager account. Check out our instructions on how to set up a GTM account.
Step 2: Implement Google Analytics using Google Tag Manager
Google Tag Manager and Google Analytics will play nicer together if you use Tag Manager to implement Google Analytics, rather than using a third-party code infusion plug-in or copying and pasting the Google Analytics tracking code into your site’s head code. It only involves an extra step or two and is as simple as setting up a Google Analytics tag that will be triggered on every page of your site by any page visit. Here’s an easy guide on how to set up Google Analytics in Google Tag Manager.
Step 3: Set Up Tags & Triggers for Common Conversion Actions
Once you have your Google Tag Manager account and container set up and live on the site, as well as your Google Analytics tag and trigger set up properly in GTM, you’re ready to set up tags & triggers for your main conversion actions. We’ll start with the most common: Form Submissions.
How to Track Form Submissions in Google Tag Manager
Form Submissions are such a common action tracked that Google has pre-built Form Submissions as a trigger option. To set up a tag for Form Submissions, go to the Tags tab in the Workspace.
Start a new Tag by clicking the New button:

Name the Tag “Form Submissions” and open up the module name Tag Configuration. Under Tag Type, choose Google Analytics: Universal Analytics. Now, in Tag Configuration, make sure the Track Type is “Event” and the Category is “Form Submissions” so that it looks like this:
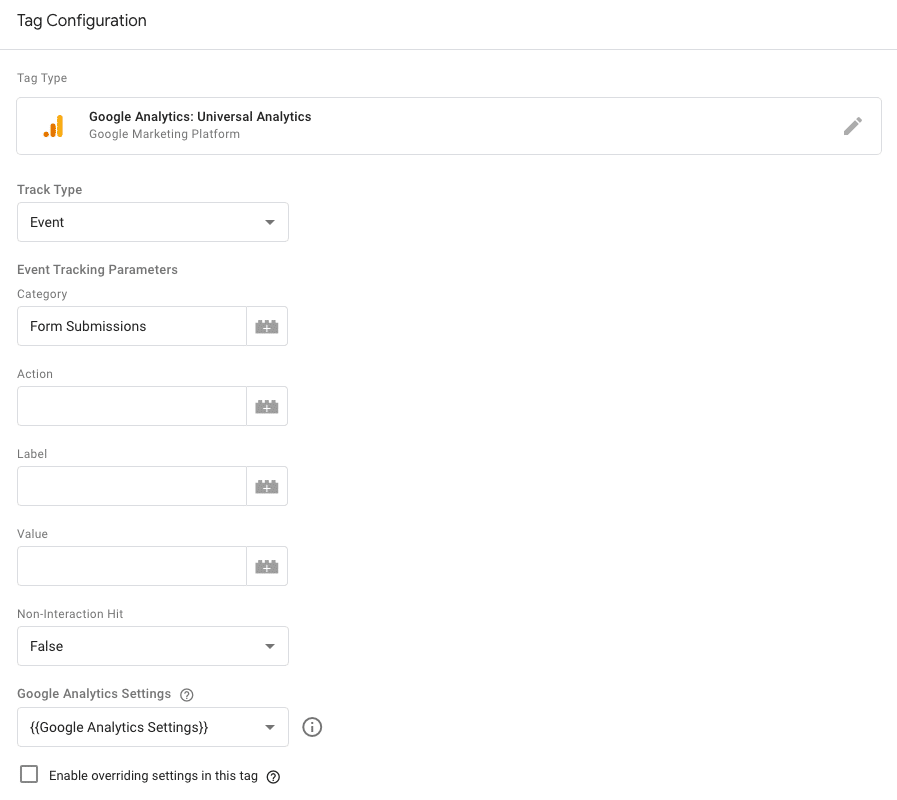
You shouldn’t need to fill out any other tracking parameters or advanced settings at this point.
Next, we’ll set up the corresponding Trigger for Form Submissions conversions. Set up a new Trigger, and name it “Form Submissions” as well.

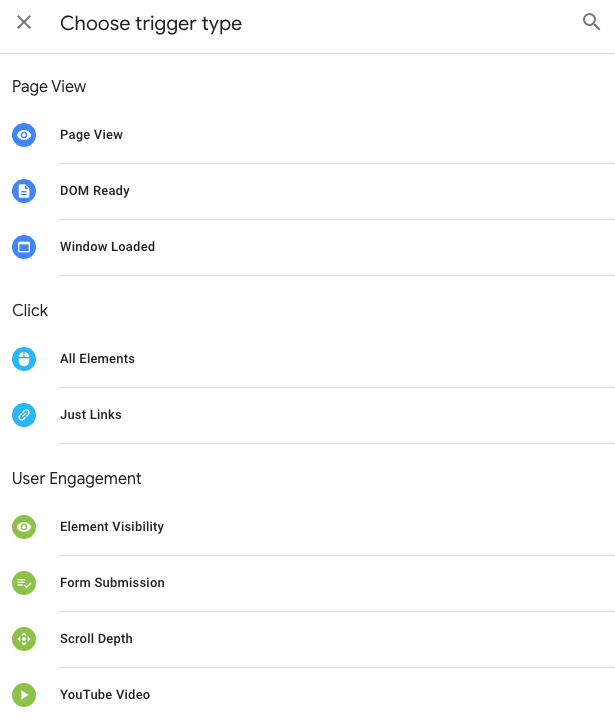
Choose the Trigger type by clicking on the Trigger Configuration element, and choose “Form Submission” under User Engagement in the trigger type dropdown menu.
If you want this to track submissions on any and every form you have on your site, keep “All Forms” selected. If you want to, you can tighten the parameters to forms on a specific page, on pages within a specific subfolder, or even to a specific form ID or class, using the “Some Forms” option and selecting those parameters from there.
The Wait for Tags option, if selected, will delay a new page load or bounce following the submission of the form. This gives the trigger and tags a chance to fire before a new page loads. 2000 milliseconds is the default value and is a good amount of time to go with. This isn’t necessary on most sites, however, and Google recommends only using it when you need it.
How to Fix Form Tracking Errors in Tag Manager Caused by Facebook Pixel
There is a known issue that occurs with this type of Tag setup if you’re also using Tag Manager to add a Facebook Pixel to your site. FB Pixel can trigger a gtm.formSubmit event which can result in false Form Submissions triggers on page loads, which in turn can skew conversions or goals metrics by quite a bit. To avoid this, check the “Check Validation” box and only enable the trigger when the Click URL does not contain facebook. It will look like this:
![]()
Step 4: Test Your Tags and Triggers in Google Tag Manager
Once you’ve set up Tags and Triggers for the conversion actions you want to track, it’s time to test to make sure they work. The best way to do this is to use the debug feature in Google Tag Manager.
Go to the main workspace and hit the “Preview” button. This will open up a new tab requiring you to enter the URL of the site you’re testing on. Once you enter this, a new window will open with the site loaded in the debug tool – you’ll see “?gtm_debug=x” or something similar following your site URL. Don’t close your other Google Tag Manager tabs or windows, though – you’ll need to watch to see if your conversion actions track properly.
Once you’re in the debug window, go ahead and complete the conversion actions you’re trying to track. In a form submission, it may be helpful to add a note that you’re testing the form or let the sales team know to expect some test submissions.
This is what the output looks like when I tested a phone link clicks tag and trigger on our site:
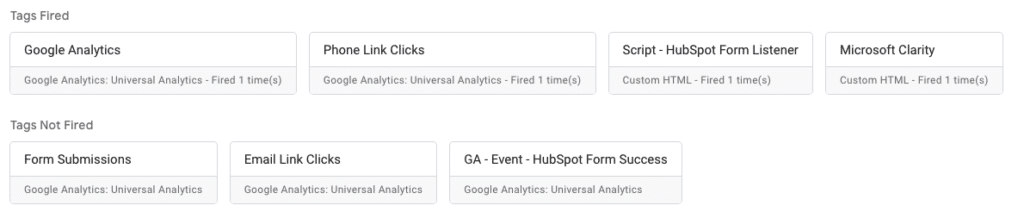
You’ll see that the phone link clicks tag fired under the “Tags Fired” section. If your tag doesn’t fire, it will stay under “Tags Not Fired”. Make sure your tag didn’t fire more than once – it will show you have many times it did fire under the tag title. I see here that my tag fired just once, as it should. If it fires multiple times, it will be tracked too many times as a goal in Analytics.
Do this testing step with every new tag you’ve added. If you have multiple forms on your site, test each one. If at any point your tags aren’t firing, double-check each setting and parameter on the tags and triggers. Once you’re satisfied that tracking is working, publish the workspace and name it so that you can tell which iteration has been published. Something like “Goal Tracking Added” or whatever naming convention works for you and your team.
Step 5: Set Up Goals in Analytics
Now we need to set up a goal in Google Analytics that corresponds to each tag you’ve set up in Tag Manager so that each conversion action is tracked as a goal in GA.
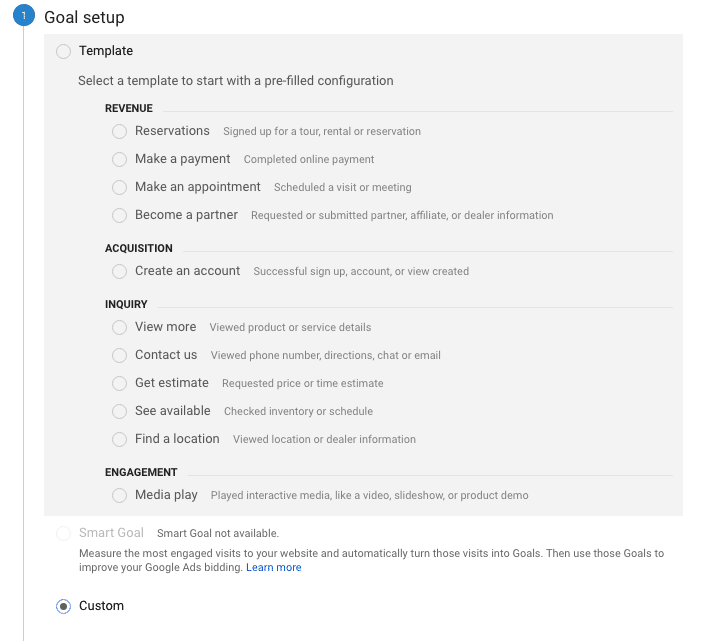
Go to the Admin tab by clicking on the gear icon in the left side vertical menu. Under Admin > Views > Goals, you can create new goals. It’s marked by a flag icon. Click on the red button reading + New Goal. For all of the conversion events we’ve set up Tags and Triggers for, you’ll need to set up a Custom goal. It’s the final option in the Goal setup menu.
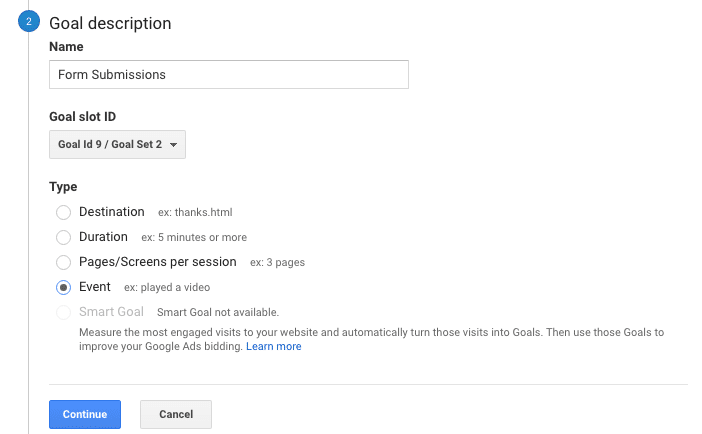
Continue on to the Goal description. For each goal, name the goal with the same naming convention as the corresponding tag: Form Submission, Phone Click Links, Email Link Clicks, etc. Each of these should be set up as the “Event” goal type.
In the third step, Goal details, make sure the Category matches the corresponding Tag name exactly, capitalization, and any spaces included. This is vital to have the Goals in Analytics correctly attached to the Tags and Triggers in Tag Manager. We shouldn’t have to enter any information into Action, Label, or Value at this point to have these actions tracked properly.
There is an option to “Verify this Goal,” but this tool only works if you’ve had these Tags active for at least a couple of days, if not a week, before setting up Goals. This tool tracks the new Goal parameters against any tracked events that match the parameters to see how many times the Goal would have been completed in the past week if the Goal was already active. After a day or two, if you want to confirm that Goals are tracking in GA, run some more conversion action testing on the site to see if they show up in GA. If you have your IP address filter set up in Analytics, use a VPN or have someone at a different IP complete the test conversion actions.
If you need assistance with tracking how your traffic behaves on your site, setting up Tags, Triggers, and Goals, or generating leads to your site, contact us. It’s impossible to quantitatively improve what you can’t measure.
Share this article:
The Avalanche Email: Fun. Simple. Educational. No Selling.
Learn Result-focused SEO & Content
Join over 2,272+ others who get one email every Wednesday with simple instructions on how to get more website traffic and leads through SEO and content marketing. (Learn more about the email)


Keep Learning
Volunteering at Kids’ Food Basket – ’26 Retreat
See how the Avalanche Creative team gave back at Kids’ Food Basket, packing burritos for families across West Michigan during our retreat.
Saving the Galaxy at our ‘26 Company Retreat
See how the Avalanche Creative team spent our 2026 company retreat in Holland, MI: a Star Wars themed week of strategy.
Good Content Generates Leads. Here’s How.
How do you generate leads from content marketing? It’s not hard, but it can feel risky. Navigate the Sea of Sameness by leaning on your brand’s expertise, unique perspectives, and personality. AI can build your content ship, but human writing is how people trust the captain.
Stop Publishing Content That Nobody Finds
Content templates help plan the work before a word gets written. Learn why you should use them and how to set them up.
How To Show Up in Gemini (And Win More Local Jobs)
Show up in Gemini when homeowners search for landscaping services. Build the right signals on Google and your website to win more qualified local jobs.
How to Run Google Ads for Landscapers: A Complete Guide
Learn how to set up Google Ads for landscapers, attract qualified leads, and win more local jobs with this step-by-step guide.