How to Set Up & Install Google Tag Manager
Category: Search Engine Optimization | Tags: SEO, getting started, guides, wordpress
What is Google Tag Manager (GTM)?
Google Tag Manager is a tool & service provided by Google, used for implementing tags on your website without having to deal directly with the code on the site. It allows for easy implementation of tags that can be triggered by user actions or behavior on the site. So why install Google Tag Manager?
It allows you to track and quantify those user actions that are valuable or informative, and when used in conjunction with Google Analytics, it can be used to track conversions to help you get bulletproof ROI or conversion value metrics for paid, social, referral or organic campaigns.
While this post isn’t nearly an exhaustive Google Analytics / Tag Manager course, after reading this you should be able to track simple form submissions, clicks to call any phone number on your site, or clicks to any email address. If you’re looking for some quick Google Tag Manager help, we’ve got you covered.
What does Google Tag Manager do?
At its core, Google Tag Manager is an easy interface for adding tags on the site that otherwise would require a certain degree of coding knowledge. There are many built-in Google Tag Manager tags that you can add to your site, and it allows you to implement custom tags as well. Think of a Google tag as a segment of code attached to an event or element on your site. Google tags are triggered by user behavior or actions on the site, which can give you tremendous insight into how users interact with your site, when you use Analytics and Tag Manager together.
How do I install and setup Tag Manager?
By now you’re most likely convinced of the benefits of adding Google Tag Manager to your site. Here’s how you do it:
1. Create your Google Tag Manager account

To set up your new Tag Manager account, you need to provide a name for the account, based on the name of your business. Then you’ll need to set up your first Google Tag Manager container. For the purposes of this article, we’ll focus on a web container.
2. Set up a Google Tag Manager Container
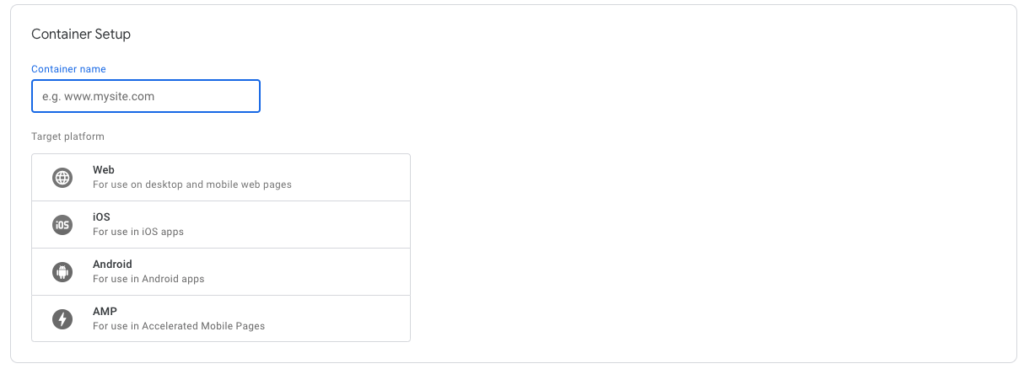
Enter the URL of the site you want to implement Tag Manager for into the Container name field. Select the Web option under Target platform. After that, you’ll need to read and accept Google’s Terms & Conditions for Google Tag Manager.
3. Set up Google Tag Manager on your site
After setting up your Web container, you’ll be greeted by a pop up window reading “Install Google Tag Manager” and prompting you to “Copy the code below and paste it onto every page of your website.” Google makes this part pretty simple, although the blocks of code can be intimidating, and the “past onto every page” may seem like a time-consuming task. There’s an easier way to do that in almost any CMS. Most of our sites are in WordPress, and a lot of yours probably are too. Either way, if you have a global header and footer on your site, if you paste the codes into those at the proper places, that will work. Here’s an easy way to do it in WordPress.
Where to set up Google Tag Manager in WordPress
My favorite way to implement Google Tag Manager in WordPress is to use the Insert Headers and Footers plugin from WPBeginner. It’s an easy-to-use plugin that helps site managers do exactly what it sounds like – insert headers and footers. In the plugin it shows you two fields, one for the header and one for the footer. Copy and paste the header code into the first field, and the body code into the second. Save the updates and navigate to your home page. It’s now time to make sure Tag Manager is working.
How do I make sure Tag Manager is working?
To check if Google Tag Manager is working, you need to enter into preview mode in Tag Manager, refresh your site, and see if the Tag Manager container is active.
Enter Preview Mode in Tag Manager
Go to the Workspace tab within Tag Manager. On the far right side of the tabs bar, under your Google account image, you’ll see Preview and Submit buttons. Click on the Preview. The Workspace will refresh and you’ll see this bold orange alert:

Congratulations, you’re now in Preview Mode.
Keep Tag Manager open and in a different tab, open up your site’s homepage. If your Tag Manager is properly set up and implemented, you’ll see an overlay window at the bottom of the viewport. It should look something like this:
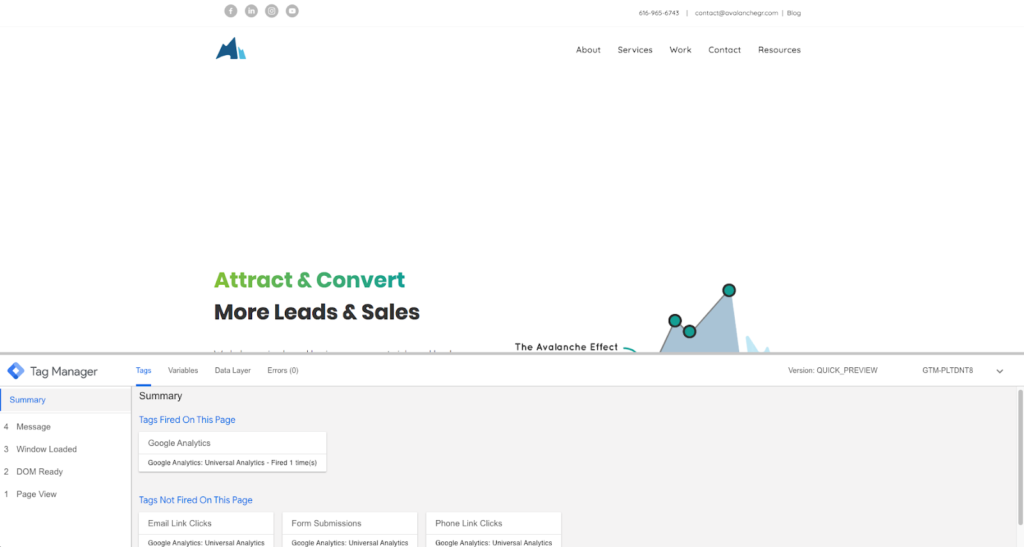
Our is showing some tags, but at this point, yours won’t be, since we haven’t gone over how to set up tags yet. Go ahead and leave Preview mode in your Google Tag Manager workspace once you get the Google Tag Manager validation.
Great! Your Tag Manager is active on the site. Now let’s connect it to Google Analytics so we can use them in conjunction to track conversions and leads on your site.
How do I connect Tag Manager to my Google Analytics?
To get the most out of it, you need to link Google Analytics with Google Tag Manager. This is a prerequisite to setting up tags and triggers that work in conjunction with your site’s analytics.
In the Workspace, you’ll see a menu on the left side reading Overview, Tags, Triggers, Variables, Folders, and Templates. Navigate to the Variables option – the one with the little building brick icon next to it.
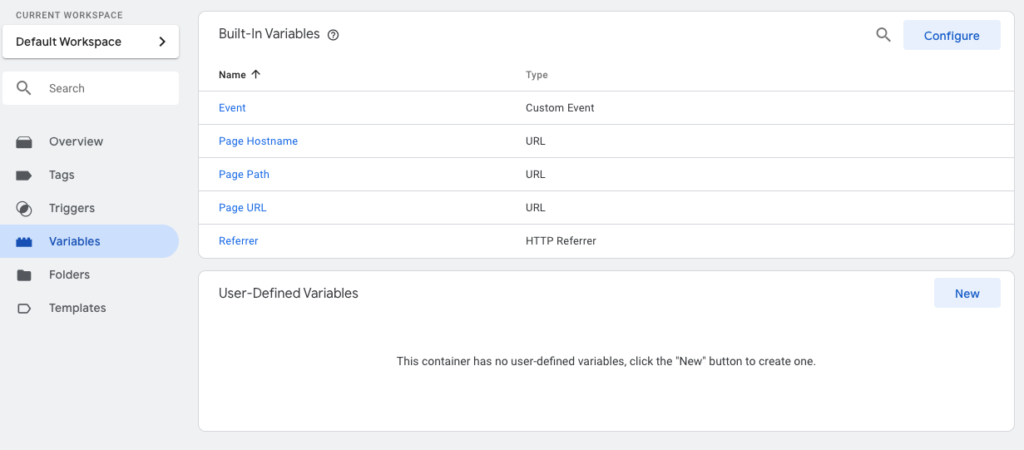
In this tab, you’ll see options for Built-in Variables and User-Defined Variables. Create a New User-Defined Variable.
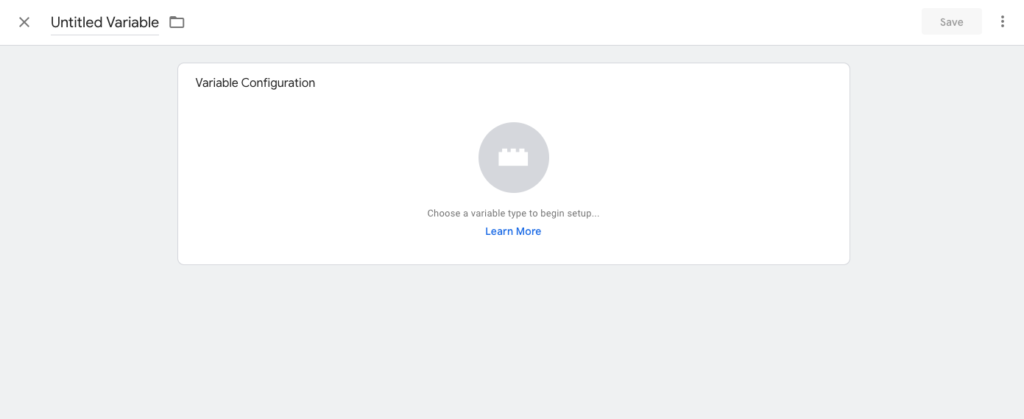
Click on the brick icon to choose a variable type. We’ll be looking for one called Google Analytics Settings. You’ll find it under the Utilities heading in the menu that will slide over. If you don’t see it at first, scroll down.
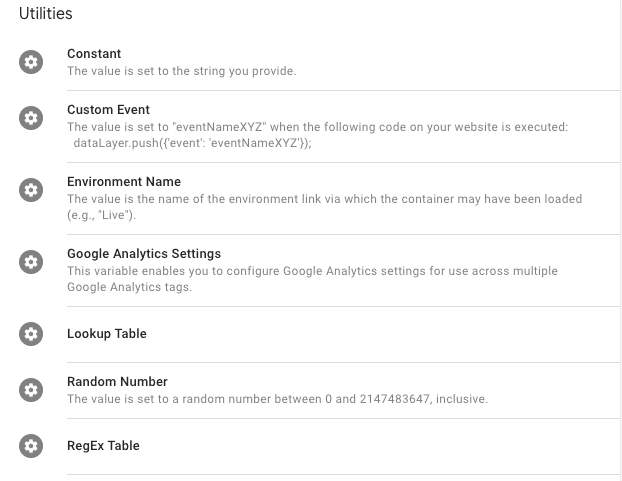
You’re almost there. In the Tracking ID field, simply paste in your Google Analytics Tracking ID. If you’re not sure what it is, or how to find it, follow the directions from Google on how to find your Tracking ID.
We recommend naming this Variable “Google Analytics Settings” once you’ve added the tracking ID. Save your new variable.
Well done – now you have a Google Tag Manager account, a container set up for your website, and you’ve made sure Google Tag Manager is working and active on your site. Not only that, but you’ve connected Google Tag Manager and Google Analytics using your Tracking ID. You’re ready to start setting up Tags & Triggers, and soon you’ll be tracking goals in analytics based on the actions users take on on your site.
Can someone help me get Google Tag Manager on my site?
If you’re not confident in this process of setting up Google Tag Manager, any SEO should be able to get it set up for you. We’re all about creating quantifiable conversions so you can be confident in your results and return on investment. That can’t be done without measuring and tracking the valuable actions users take on your site. If you’re interested in SEO Services, including SEO Research & Strategy, Content Management, and SEO Education, reach out to us! We’d be excited to help you rank higher, attract more quality traffic, get leads, and build authority.
While you’re here, check out our other free resources and start building your own momentum.
Share this article:
The Avalanche Email: Fun. Simple. Educational. No Selling.
Learn Result-focused SEO & Content
Join over 2,272+ others who get one email every Wednesday with simple instructions on how to get more website traffic and leads through SEO and content marketing. (Learn more about the email)
Keep Learning
How To Show Up in Gemini (And Win More Local Jobs)
Show up in Gemini when homeowners search for landscaping services. Build the right signals on Google and your website to win more qualified local jobs.
How to Run Google Ads for Landscapers: A Complete Guide
Learn how to set up Google Ads for landscapers, attract qualified leads, and win more local jobs with this step-by-step guide.
🏔️ Watering > Planting New Seeds
Your next marketing win may already be on your site. Learn how to optimize existing pages for better rankings, traffic, and results.
The Recipe vs. The Meal
Your customers buy the experience, not the product. Discover a simple way to shift your message from ingredients to the full meal.
🏔️ Hook, Line, and Sinker 🎣
Use this fishing framework to turn your posts into stories that capture attention, create tension, and inspire action from your audience.
🏔️ Avoid Everything That Doesn’t Move You Forward
Stop chasing shiny tools and refocus on what moves your marketing toward the end zone. Simple steps to cut noise and make steady progress.


