The Ultimate Guide to Setting Up and Using Free Google Tools for SEO
Category: Guide, Search Strategy | Tags:
We all know that Google is the powerhouse of search. When it comes to search engine optimization (SEO), Google is the go-to platform that SEO professionals use to look for resources. Believe it or not, Google offers a ton of free tools under its Marketing Platform that you can (and should) use in your SEO efforts.
Below is a basic guide to getting started and using Google’s SEO tools for your website’s organic search visibility. We’ll also cover how to add users or other agencies to these profiles, which allows these specialists to make necessary adjustments to your website without needing your login information.
Table of Contents
Google My Business
A Google My Business (GMB) profile is essential for your business, especially if you want to attract local traffic. This profile will allow you to appear in Google search results that have local intent, such as “hair salons near me”. Typically, results for local searches will appear in map form near the top of the search engine results page (SERP).
Setting Up Your GMB Profile
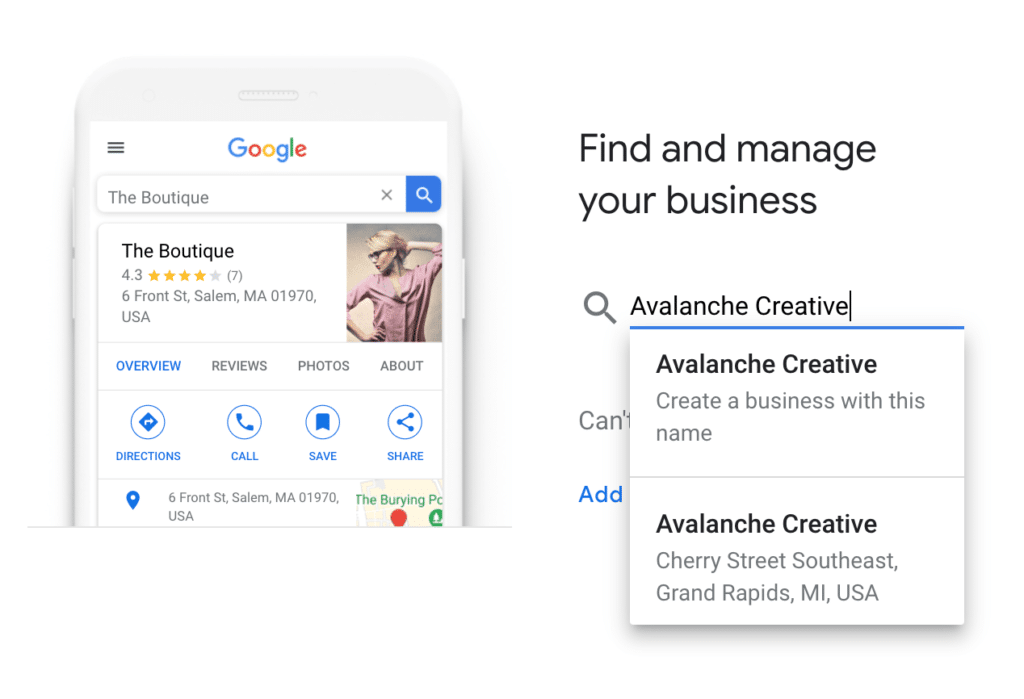
To get started and either create or claim your listing, visit google.com/business/ while signed in to the primary email that you use for business, and click “Manage Now”. Then, you’ll just need to enter your business name and either click on its existing listing or select to create the new listing.
From there, you just need to follow the steps to provide as much information about your business as possible. Here are some setup tips to make your GMB listing successful:
- NAP Consistency: Make sure that your business name, address, and phone number are listed the exact same way that it is listed on other directory websites and listings. This in particular is an SEO ranking factor.
- Verification: You will need to verify your ownership of the GMB listing by providing an address that Google can mail a postcard to. This is an important step in appearing in Google Maps!
- Service Area: Even if you don’t have a physical location for customers to visit you, be sure to list your service area on your listing so that users within that service area will know that you’re ready to help!
- Set up Tracking: When linking to your website, phone number, or blog posts from your listing, make sure to set up UTM tracking with these links. Click here to learn more about setting up UTM tracking in GMB.
- Add Photos: Feel free to personalize your listing by adding photos of your location (inside and outside), your employees, and your products or services, if applicable. This shows users that you are active on GMB and are, obviously, a legitimate business.
Adding Users to Your GMB Profile
If you’re working with an SEO partner like Avalanche Creative, you might be asked to grant them access to your GMB profile. Here is how to add a user to your profile:
- Sign in to Google My Business on your computer.
- In the menu on the left-hand side, click “Users”.
- In the top right-hand side of the popup, click “Invite new users”.
- Enter the email address of the user you’d like to invite.
- Select their role as “Owner”, “Manager”, or “Site Manager”. Typically, agencies like Avalanche will require “Owner” access to your GMB to properly manage it.
- Click “Invite”, and you’re done!
Managing Your GMB Profile for SEO
Once your profile is set up and verified, your work isn’t done! Here are some suggestions for ongoing management of your GMB profile to support your SEO efforts:
- Share Posts: It’s a good idea to promote your website’s content as posts to your profile. Any opportunity to use Google’s products can help your profile gain more visibility in search.
- Boost Reviews: Encourage your customers to leave a review on your business page. Google scrapes content from Google Reviews to use in search results. Learn more about how to get more reviews on Google in this post.
- Add Products & Services: GMB allows you to add specific products or services to your profile to help you gain more relevance in search and boost clicks. Link to these products or services on your website from the GMB using UTM links.
- Answer Questions: Another feature of GMB is Questions & Answers. If you notice that a user has asked a question on your GMB profile, be sure to answer it!
- Link to Your GMB: On your website, add a link to your GMB profile to encourage more views and activity.
Google Search Console
Google Search Console is a great product to familiarize yourself with if you’d like a basic understanding of SEO and how to improve your website’s visibility in search. When you sign up, you’ll get email alerts when Google recognizes issues with crawling your website. Google will give you tips on how to improve your SEO and better organize the information on your website with the user in mind.
Setting Up Your Search Console
To get started, visit Google Search Console and enter your domain (website address) in the “Domain” property section. Follow the instructions to verify ownership of your website. Once verified, it will take a few days for your console to populate with information.
Another important setup step is to submit your website’s sitemap in Google Search Console. This allows the search engine to index your website for search.
Adding Users to Your Search Console
Your search console contains a lot of helpful information on keywords that are bringing traffic to your website. Agencies or specialists like Avalanche Creative might ask for access to your Search Console to use for reporting purposes.
Here’s how to add users:
- When logged in to your Search Console, make sure you have the correct “property” (website) selected in the top left-hand corner of the screen.
- Then, click “Settings” in the left-hand menu, and click on “Users and permissions”.
- Click the “Add User” button in the top right-hand corner.
- Enter the email address of the user you’d like to add to your search console and click “ADD”.
Using Your Search Console for SEO
Google recommends checking your search console dashboard about once a month to make sure that your site isn’t experiencing an increase in errors or an unusual drop in click counts.
It’s also a good idea to check your console anytime you change or update the content on your website. To ensure that Google can crawl this new page or pages, we recommend resubmitting your sitemap on Search Console. It might take a few weeks to see the number of indexed pages on your site increase after you post new content.
Google Analytics
Google Analytics (GA) can be used to track a myriad of clicks, conversions, and many other activities on your website. Here at Avalanche, for example, we set up “goals” for our retainer clients in order to track organic conversions on their websites.
Even if it’s difficult to read your GA dashboard, it’s important to get it set up to start tracking visitors and traffic so that any agency or specialist that you might eventually work with can view previous data.
Setting Up Your GA
If you don’t have Google Analytics set up for your website right now, getting started is very easy. Visit google.com/analytics and click “Start for free”. You will need to set your website up as a property, then you will just need to follow the directions for adding a code to your website (or Tag Manager) to verify ownership and start tracking.
Adding Users to Your GA
Your website’s Google Analytics can provide digital marketing agencies and specialists with important information on how your customers use your website. Here’s how to securely add them to your GA account.
- To add a user to your GA, start by logging in and selecting the website property that you want to add them to.
- On the left-hand menu towards the bottom, select “Admin”.
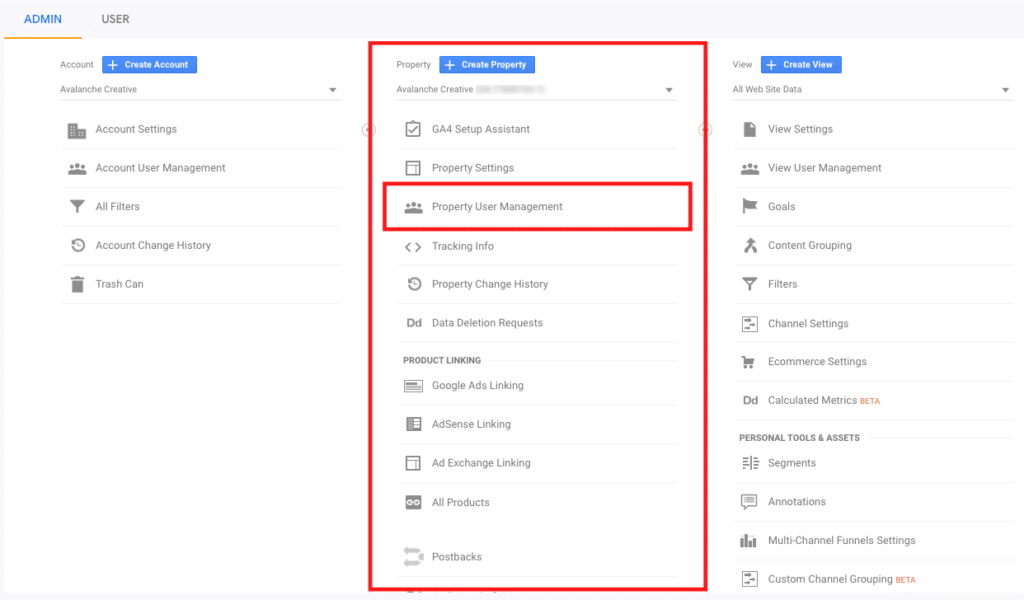
- On this next page, you’ll notice three columns: “Account”, “Property”, and “View”. For the purpose of this tutorial, we want to manage the permissions for the “Property”. Click the “Property User Management” link under the “Property” column in the middle.

- Click the blue “+” icon in the top right corner.
- Select “Add new users”.Enter the email address of the user you’d like to share access with, then select the permissions you’d like to grant them. Typically, an agency will need “Manage Users” access to your website property.
- Save your changes.
Using Your GA for SEO
Set Up A Dashboard for Your KPIs
Google Analytics provides many metrics and data points, and it can be daunting to sift through. We recommend setting up a basic dashboard that highlights the metrics or KPIs that are most important to you. Some of the most valuable to track from an organic standpoint are:
- Sessions
- Goal Completions
- Sessions by Source
- Bounce Rate
- Avg. Session Duration
- Sessions by Location
Always make sure you are viewing both the total traffic and the organic segment of your traffic, at least, so you can compare how your organic visitors interact and convert compared to other sources of traffic. 
Here is a Google Analytics SEO KPIs dashboard template you can use. This includes the list of metrics above and more.
Set Up Goals to Track Conversions
To track goal completions, you’ll need to set up goals in Google Analytics. We recommend setting up goals for actions users take on your site that you’d describe as a conversion, or a generated lead. Common actions to track are form submissions, clicks-to-call on phone numbers on your site, clicks-to-email on your site, and if you have e-commerce set up, any purchase.
If you provide free ebooks, whitepapers, or other resources, you should track these downloads as well. We explain how to set up these types of goals in this post.
Filter Out Internal Traffic
How often are you on your own website, or your co-workers or employees? If you’re tracking this internal traffic along with the rest of your site traffic, it could be skewing your metrics. Filter out personal and office IP addresses under Admin > View > Filters. This way, you won’t be running up your sessions count, running down your conversion rate, or skewing other data.
Google Tag Manager
Google Tag Manager allows you to manage multiple tags and codes embedded in your website from one dashboard. These codes allow you to track certain events and actions on the site. Think of tag manager as one code that contains all the codes you may want to add to your website. Read more about Google Tag Manager in our guide here.
Setting Up Your Tag Manager
Unless your website was created by a professional digital marketing or web design agency, you probably don’t have Google Tag Manager set up already. Here are the steps to setting up your Google Tag Manager for the first time.
- When logged in to the main Google account for your website, visit Tag Manager’s homepage.
- Click “Create Account” in the top right corner.
- Type a name for your account, then click to create a container for your account. For a website, select “Web” under the “Target platform” section. Make sure that you have your website’s URL in the “Container name” field.
- Click “Create”, and accept Google’s terms and conditions to continue.
- To install the tag manager on your website, the prompt will tell you to copy and paste the code on every page of your site. The best way to do this is to paste the code into a global header or footer of your website.
Adding Users to Your Tag Manager
You may want to add more users to your tag manager to allow them to add codes to your website without giving them full admin access to the back end of your site. To do this, click “Admin” in the top menu of the tag manager dashboard. Then, select “User management” under the “Account” column. Click the blue “+” icon and select “Add new users”.
Enter the email address of the user you’d like to add, then select the permissions. “User” is selected by default, but you may want to make the user an “Administrator” of the tag manager. Finish by clicking “Invite” to save your changes.
Using Your Tag Manager for SEO
The biggest benefit of Tag Manager for SEO purposes is the ability to set up Tags, which are fired using Triggers based on specific actions users can take on your site. Properly implemented Tags and Triggers allow you to set up corresponding Goals in Google Analytics based on these conversion actions.
The standard actions we like to track are Form Submissions, “Phone Link Clicks” or clicks-to-call, and “Email Link Clicks” or clicks on any email address on your site. If you offer downloadable resources like ebooks or whitepapers, these downloads should be tracked as well.
Google Analytics should also be implemented using Google Tag Manager, rather than implementing the Google Analytics tracking code into the header code using the backend of your CMS or any additional code infusion plugin. Learn more about how to integrate GA and Tag Manager here.
Tag Manager can help you track your social media marketing efforts, too! It is the best way to implement Facebook Pixel, which is used to coordinate and share data with FB’s Ads Marketplace. In general, any type of Javascript or HTML tag you’d want to implement can most likely be implemented cleanly in Google Tag Manager.
Get the Guide
Complete the form below to get the 6 easy steps for setting up Google Business Profile tracking sent directly to your email.
Share this article:
The Avalanche Email: Fun. Simple. Educational. No Selling.
Learn Result-focused SEO & Content
Join over 2,272+ others who get one email every Wednesday with simple instructions on how to get more website traffic and leads through SEO and content marketing. (Learn more about the email)
Start Tracking Today!
Download The Google Business Profile Tracking Guide
Get our step-by-step guide for setting up Google Business Profile referral tracking.
No fluff, just 6 easy steps.
Related Resources

Download our SEO Process.
Keep Learning
Creating the Perfect SEO Content Template in Google Docs
Learn how to create an SEO Content Templates in Google Docs to help drive new traffic to your website from the search engines. SEO Content Templates provide specific recommendations and directives for creating new content on your website with the purpose of improving your SEO.
How To Show Up in Gemini (And Win More Local Jobs)
Show up in Gemini when homeowners search for landscaping services. Build the right signals on Google and your website to win more qualified local jobs.
How to Run Google Ads for Landscapers: A Complete Guide
Learn how to set up Google Ads for landscapers, attract qualified leads, and win more local jobs with this step-by-step guide.
🏔️ Watering > Planting New Seeds
Your next marketing win may already be on your site. Learn how to optimize existing pages for better rankings, traffic, and results.
The Recipe vs. The Meal
Your customers buy the experience, not the product. Discover a simple way to shift your message from ingredients to the full meal.
What’s the Best CMS for Landscaping Businesses?
Compare the best website platforms for landscapers. Learn the pros and cons of Wix, Squarespace, and WordPress, and why WordPress is best for long-term SEO.


